PLANT SUGGESTIONS Most good plants work well as a centerpiece. However, some don’t do well in the sides. Stick to impatiens, begonias, coleus, scaevola Blue Wonder, creeping Jenny, ivy, torenia, lamium, melampodium, pothos, variegated mint, Supertunias, Easy Wave petunias and sweet potato vines. Avoid marigolds, periwinkles (they live, but stick out awkwardly), marguerite daisies, fuchsias, most petunias (other than Easy Wave and Supertunias) and snapdragons.
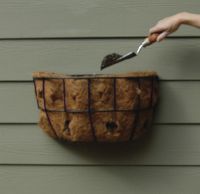
STEP 1 After hanging the wall planter, spray it with water to soften the coco fiber. Add potting mix up to the bottom of the first hole. Be sure to use top-quality potting mix with a brand name you trust. Do not use garden soil or top soil because these soils are too heavy and can kill the plants. Work with wet or dry potting mix. If it is wet, you will lose less through the holes during planting.
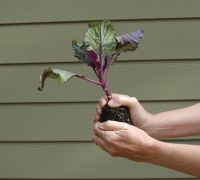
STEP 2 Remove the first side plant from the pot. Dip the roots in a bucket of water, keeping them submerged until they are completely saturated. Remove the plant and squeeze the root ball 3 to 6 times very firmly until most of the water has dripped out. (Plants with 4.5″ root balls require more squeezing than plants with 3″ root balls.) The root ball should be firm, not falling apart. If it still feels loose, squeeze it some more, until it is quite firm. (If some small pieces break off, that is okay the plants we recommend are tough plants! I have had some root balls fall completely apart. I thought they would die, but planted them anyway, and they did just fine!
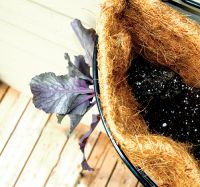
STEP 3 Push the root ball through the first hole, from the outside in (root ball first). Don’t worry if some potting mix falls off the root ball or out of the hole. That is normal. Be sure that the plant is on the outside of the container and the roots are on the inside. Adjust the flap so that it fits in between the roots and the plant. You will see some open space between the plant and the top of the hole. That is normal, and some potting mix will escape during the planting process. However, after the initial planting, very little potting mix escapes from this opening because the roots grow quickly, forming a solid mass.
STEP 4 Alternate the small plants around the sides. Fertilize with a slow-release mix like Osmocote, Nutricote, or Dynamite. If your potting mix includes fertilizer, skip this step now, adding more only if the plants leaves lose their color. The slow-release fertilizers usually last for the life of the basket. Add the centerpiece plant, adjusting the height of the soil so that the top of the root ball is about 1/2″ above the top edge of the basket.
STEP 5 Add more potting mix until it reaches the bottom of the second layer of side holes. Alternate the small plants in these openings. Plant different plants over each other.
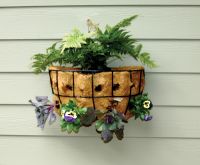
STEP 6 After soaking the first edge plant in water, squeeze it slightly between your hands to flatten it a bit like a sandwich. Place it over a different plant at an angle so that it leans slightly over the edge. Continue alternating plants until the edge is planted. Add potting mix between the root balls, as well as on any exposed roots and pat it down slightly. Don’t pile the potting mix up around the stems! Fertilize again. Do not water your finished container for about 3 days. Only water when the potting mix feels dry or the plants are wilted.